
I'm not especially committed to Hallowe'en - I don't have kids who beg me to dress up and go trick-or-treating or any particular attachment to it myself - but it is kinda cool sometimes to have an excuse to do crazy stuff, and there are some fantastic ideas for creepily-themed food out in the big wide interweb world. We also got invited to a Hallowe'en party this year (I think my first ever), and asked to bring either food or drink. And you know I would never take drink when there's an opportunity to make some crazy food...
I'm sorry I'm so late in posting this, so that perhaps they're not useful for this year, but hopefully they will inspire you for next time you need gory treats! ;-) However, my carefully planned Saturday was somewhat disrupted. I usually go to BodyAttack, which is an aerobics class, on Saturday mornings. Yesterday I traipsed along as usual (actually, I love it, so there wasn't much traipsing involved, more happy walking) and all was fine until towards the end of the second song, when my ankle rolled for no particular reason, landing me firmly on my bottom, and to add insult to injury, I was towards the front of the class of about 100 other keen gym-goers. I hopped out and sat down for a few minutes, and then my ankle seemed okay so I went back in - but when the class finished and my muscles starting cooling down the stiffness started settling in. Ugh. So I was trying to keep off my foot - and also struggling to find comfortable sitting positions due to a rather sore backside from my landing! - and so Mr Cake did most of the cupcaking on his own while I whimpered in the corner. ;-) Moral of the story? I'm a big wimp! Anyway, it did slow things down a bit, and I didn't get time to write this up before we went to our party last night.


I made two different treats - the first was bloodshot eyeballs, using some Tim Tam truffles which I had made earlier in the week (though you could use, well, anything round, white and edible). They were already coated in white chocolate so I just needed to make them look like eyes. I started off by melting some blue candy melts (you could equally use white chocolate tinted with powder colour), and cutting a little circle stencil out of greaseproof paper. I then held the stencil over each truffle in turn and spread a little of the blue stuff onto it to make an iris. They weren't perfectly smooth but this created the right effect.

I used this stuff to make the pupils - it can be pretty hard to make your own black icing, and I find I usually only want it in small quantities anyway, to do things like outlines or eyes, so having this stuff on hand saves a lot of effort. You can use a coupler and piping tip directly on the tube, too, which makes it super convenient.


The last step is making them bloodshot - I melted some red candy melts for this, and just piped squiggly lines onto them. Easy peasy! They are a bit rough, I think, but then if they looked too realistic you might not want to pop one in your mouth and that would be a big shame. ;-)


Spoon the mixture into cupcake pans - one batch of mixture should make 12 cupcakes - and bake. We slightly over-filled our cupcake papers and they were still cooked after 15 minutes, when the original recipe said they would take 20-25, so I have adjusted the cooking time. As always, though, judge for yourself - ovens vary so much. These should be light and spongy, and will spring back if pressed lightly with a finger when they're cooked.


Mr Cake whipped up a batch of cream cheese icing, and then we iced them - just a dollop of icing and a bit of spreading with the spatula.


 |
| One of my failed attempts - sugar hasn't dissolved yet |


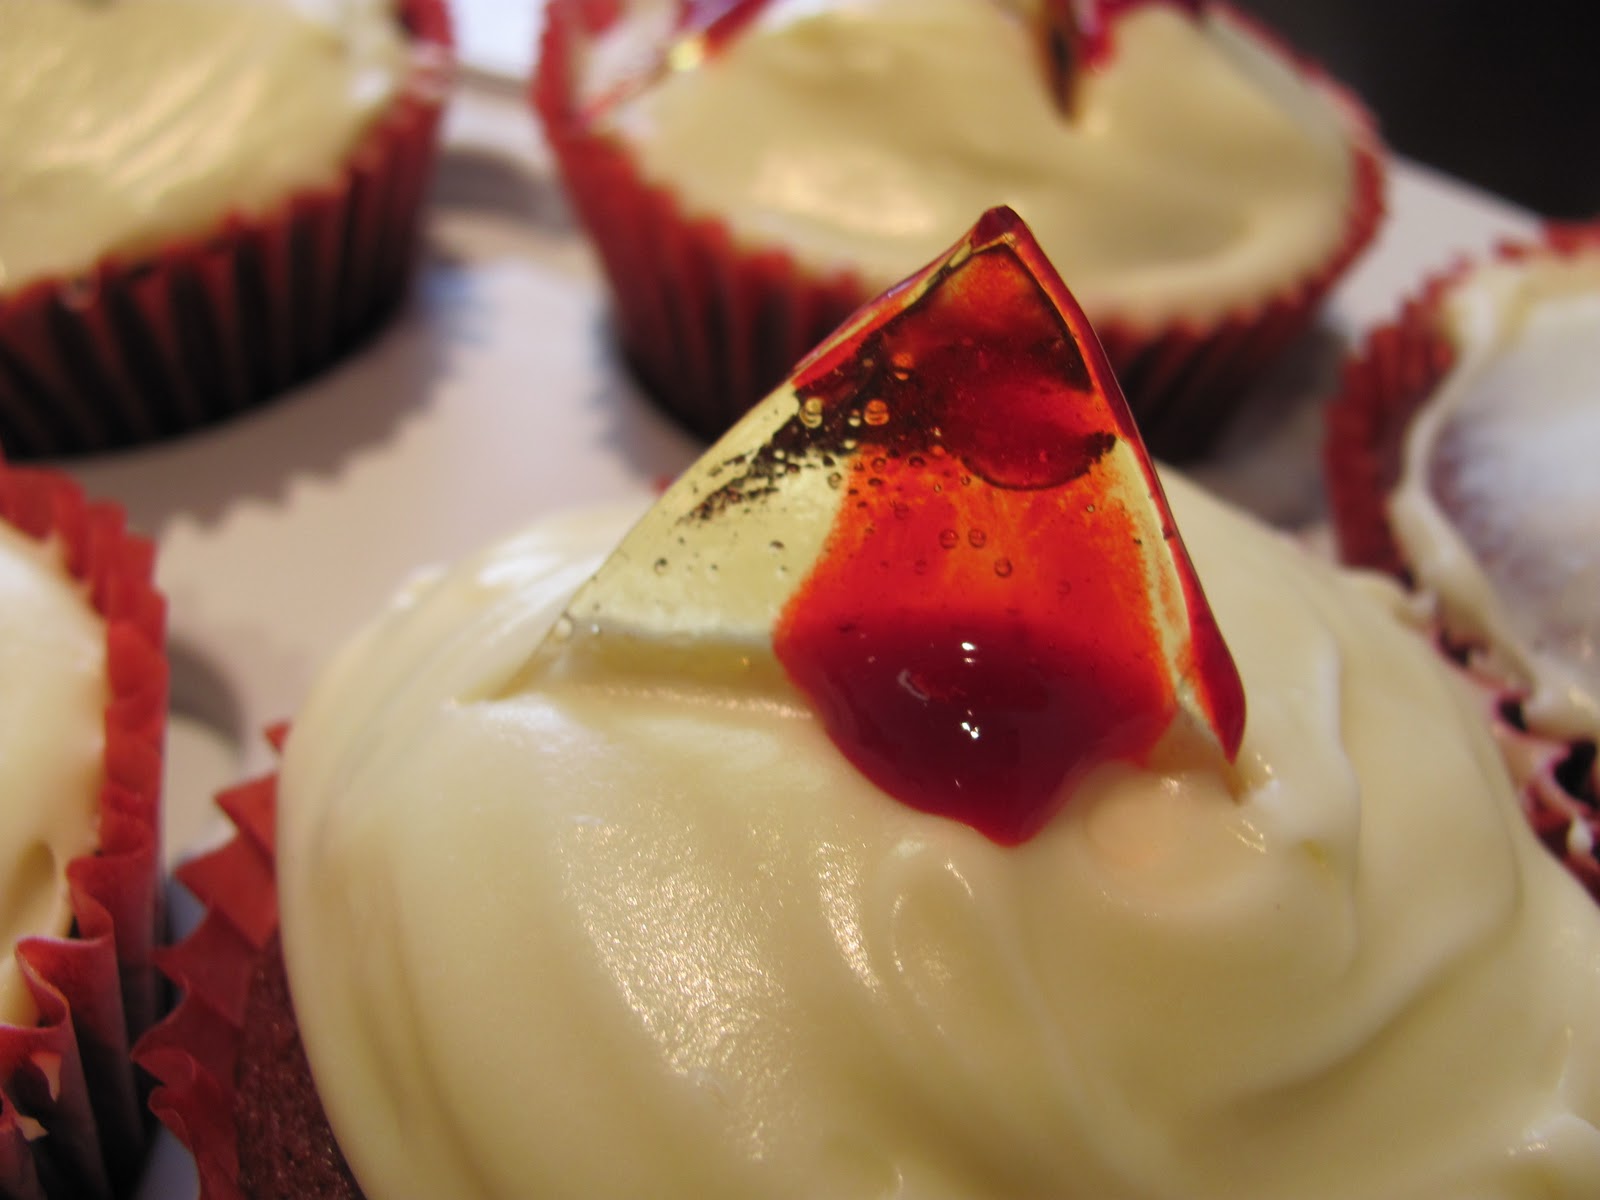
Each cupcake got a bit of glass - I think they look like a bit like fins at this point.


The cupcakes were really yummy - good work, Mr Cake! - and everyone really liked them - and the eyeballs were all gobbled up too.
What did I dress up as, you ask? Why, an aerobics nut, of course! Fluoro t-shirt, purple tights, pink leg-warmers - just the ticket! Are you doing anything for Hallowe'en?
Gory Red Velvet Cupcakes (makes 12 cupcakes)
Ingredients
60g butter
150g caster sugar
1 egg
10g cocoa powder
20ml red food colouring
1/2 tsp vanilla extract
120ml buttermilk
150g flour
1/2 tsp salt
1/2 tsp baking soda
1 1/2 tsp white wine vinegar
Preheat oven to 170°C and line a muffin tray with cupcake papers. Put the butter and sugar in a bowl and beat on a medium speed with an electric whisk until light and fluffy and well mixed.
Gradually add the egg, beating all the while, and beat until everything is well incorporated.
In a separate bowl, mix together the cocoa powder, red food colouring and vanilla extract to make a thick dark paste. Add to the butter mixture and mix thoroughly until everything is combined and coloured.
Add half the buttermilk and beat until well mixed, then add half the flour and beat until everything is well incorporated. Repeat this process until all the buttermilk and flour have been added. Beat until the mixture is smooth. Add salt, baking soda and vinegar. Beat until well mixed, and then beat for a couple more minutes.
Spoon the mixture into the cases until 2/3 full and bake in the preheated oven for 14-18 minutes, or until sponge bounces back when touched. Leave the cupcakes to cool.
Cream Cheese Icing
125g cream cheese
25g butter, softened
100g icing sugar
1/2 tsp vanilla extract
Cream butter, then beat together all ingredients until creamy and smooth. Spread icing onto cupcakes with a spatula.
Gory Topping
150g caster sugar
20ml water
100g raspberry topping
red food colouring
Line a heatproof tray with baking paper. Place the sugar and water in a small saucepan and mix together; put over low-medium heat and allow to melt and caramelise. When the sugar is light amber and sugar is dissolved pour onto the baking paper, as thinly as possible, and allow to set. When cool, break into pieces.
Top each cupcake with a shard of toffee by pressing gently into the top of the cake. Strain the raspberry topping then mix food colouring into it until it looks like blood. Spoon blood onto the tip of each shard - it should create a gory trail as it drips down onto the cupcake. Use a small paintbrush to touch up if needed.


 Hi! I'm Rosa, a.k.a. Mrs Cake, and I live in Wellington, New Zealand. I love food in all its forms, my fabulous family, and a bit of good old-fashioned Kiwi DIY. This blog started around food but has evolved to include some other bits and pieces - I hope you'll join me for the journey!